
")
Pancakes are popular around the world for being a delicious and customizable breakfast food. They taste even better when you incorporate oats into them, which contain many healthy fibers and nutrients. Oatmeal pancakes are great to have when you want to enjoy the taste of pancakes while helping your body get the valuable nutrients it deserves.
What kind of oats should you use for oatmeal pancakes?
Generally, most recipes call for rolled oats to be infused in your pancakes. Keep in mind, however, that oats are high in carbs, just as pancakes already are. Portion your pancakes properly and don’t eat too much, or you will find yourself running to the restroom more often than you’d like.
Rolled oats are easy to mix in most baking recipes, and they make your pancakes taste great. They are the simplest and cheapest types of oats to use in your oatmeal pancakes.
Whole-grain oats are, in most recipes, the healthiest option you can choose for your pancakes. When people say that oats are full of fiber and protein, most of the time they are talking about whole-grain oats.
One cup of whole grain oats contains 10 grams of protein and 54 grams of carbs, 8 grams of which are high-quality fibers that form a gel in your stomach. This gel helps your intestines capture food more easily, which helps stave off hunger. These oats also contain many essential vitamins and minerals, such as copper, magnesium, zinc, and iron. Check out this article if you want to read more about the health benefits of oats.
Oats are naturally gluten-free, but they may come into contact with gluten-containing grains during production or preparation. Be sure to purchase oats from a reputable supplier if you possess gluten allergies.
Soaking your oats-should you use water or milk?
Before making your oatmeal pancakes, you must soak your oats in a liquid like water or milk. This is important for 2 reasons:
- Soaking the oats softens them, making it much easier for your body to absorb and digest them. You will be surprised at just how effective softened oats are at preventing hunger throughout the day, which ultimately helps you lose weight.
- Soaking the oats makes them less clumpy when mixing your pancake batter. Thanks to this, the oats mix better in the batter and do not interfere much during the cooking phase.
Soak your oats in water or milk for 10 minutes. During this time, you can be efficient and gather your other ingredients in preparation for your recipe.
It doesn’t matter whether you soak your oats in milk or water-they both help you achieve the desired effect for your recipe. What does matter, however, is which liquid you end up using in your batter.
Milk adds richness and flavor to most batters, which results in fluffier and moister pancakes. It is the better option for plain oatmeal pancakes, and the recipe featured in this article will call for whole dairy milk. It is important to note that any milk, whether dairy or non-dairy, will work great with this recipe.
Water is easier to use and is great if you want to combine your mix with ingredients that specialize in their flavor, such as strawberries, blueberries, and chocolate chips. Water is also the recommended option for your pancakes if you use premade pancake mixes that specifically call for water.
It is ultimately up to you to decide if you want to use either water or milk in your pancake recipe.
Gluten-Free Oatmeal Pancakes
Equipment
- 1 non-stick cooking skillet
- 1 mixing spoon or whisk
- measuring cups
- several medium bowls
- 1 spatula
Ingredients
- 1 cup old-fashioned rolled oats/whole-grain oats
- 1 cup milk/water any kind of milk/water works fine
- 2 large eggs
- 1 tbsp unsalted butter
- 1 tbsp granulated sugar
- ⅔ cup gluten-free AP flour almond/buckwheat flour is also good
- 2 tsp baking powder
- ½ tsp pure vanilla extract
- ¼ tsp salt
- ¼ tsp ground cinnamon/nutmeg optional
Instructions
- Put the butter in a small bowl and melt it by microwave or stove. Allow it to cool off.
- Combine the oats and the water/milk together in a medium bowl. Set it aside for 10 minutes. During this time, gather all other ingredients and equipment.
- Add the butter, sugar, vanilla, and eggs to your oat bowl. Stir until everything is well combined.
- Mix all remaining ingredients (flour, baking powder, salt, and cinnamon/nutmeg) in with the wet ingredients. If it helps, try mixing the dry ingredients in a separate bowl or add them in one at a time. Mix everything together until you have a well-combined batter.
- Heat a skillet over a stove at medium heat. Lubricate the skillet with a bit of butter and drop some batter in to form a pancake that is 4 inches in diameter.
- Once the bottom of your pancake appears cooked and golden-brown, flip the pancake over with a spatula. The time it takes to cook varies depending on the temperature. Be sure to set your stove to medium-low heat over time to prevent burning the pancake.
- Once your flipped-over pancake appears golden-brown on the bottom, remove it and serve it on dish.
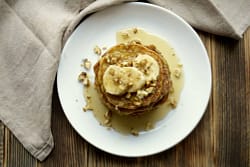
- Repeat steps 5-7 until the pancake batter is finished. Serve with some whipped cream or maple syrup if you prefer.
How to store oatmeal pancakes
Store the pancakes in an airtight container in the fridge for no more than 5 days. Oats and pancakes can get soggy fast, so be sure the container you store it in does not let any air in.
If you want to freeze your pancakes, either wrap them in aluminum foil or place them in a freezer-safe container, then place them in the freezer. They should last up to 3 months this way, but must be thawed out completely before placing them in the microwave.

")


